
How to Start a Successful Blog With Squarespace in 2022
If you’re reading this post it’s probably because you’re thinking about starting a blog. But you might be feeling overwhelmed with all the different platforms and things you should or shouldn’t be doing. Fear not! This blog post will teach you exactly how to start a blog using Squarespace.
What is Squarespace?
Squarespace is a website platform that I love and use myself and recommend to literally everybody. It’s so good because it’s so easy to get started, and it’s simple enough that anyone can learn how to use it. Unlike platforms like Wordpress, the learning curve is small and it’s super quick to set up and get going.
I’ve been using Squarespace for a long time and have used it for all my client websites. I know the platform really well, so take my word for it – Squarespace is the best option for starting a gorgeous, easy to use blog.
1. Pick Your Domain
A domain is the website address – for example, untitledsite.co is my domain. The reason I recommend doing this first is because you don’t want to spend time making your website to discover the domain name you wanted is taken!
Squarespace does offer a free domain IF you purchase an annual subscription, but this only lasts for the first year. Depending on the domain you pick, you could end up paying up to £56 each year after, which isn’t the best price you can get. Squarespace also offers a business email through a partnership with G Suite, which gets you a year’s free subscription to G Suite and (in my opinion) is well worth the year’s investment.
But I also know that many people can’t afford to drop £100+ on a website subscription when it can be paid monthly for around £10.
So if you’d prefer to pay monthly for Squarespace, you’ll need to buy your domain separately - and this is where Google Domains comes in.
Google Domains offers domains at super affordable prices. The major benefit of using Google Domains is how easy it is to connect to other Google services, like G-suite, Google Analytics and Google Search Console.
When you register a domain name, you have to provide your own personal information, like your address and phone number.
By default, all this information is publicly available in the Whois registry, which leaves you open to spam or other annoying/malicious activity.
Privacy protection changes that by hiding your information behind generic privacy information. Many domain registrars charge you for privacy protection. Google Domains, however, includes privacy protection for free as part of your purchase.
You can access Google Domains by using the same Google account you use for other services, which is a huge timesaver!
To get started, head to Google Domains and search for the domain that you want to purchase. Any available domains will display within a small tick!
Choose and checkout with your domain. You'll get the option of unticking auto-renew and privacy protection, both of which I recommend leaving on.
Once you've purchased your domain, feel free to celebrate! You're one step closer to a beautiful new blog.
2. Sign Up to Squarespace
Click here to sign up for Squarespace. The platform gives every user a two-week trial, which is more than enough time figure out if you like the platform (you will) and build a beautiful website/blog. Squarespace currently has two versions, 7.1 and 7.0. Version 7.1 is the latest and I absolutely love it! It’s even faster to build a blog, and there’s a lot of changes to the platform that have improved it even more.
When you sign up, you will be asked to pick a template. Choose the one you most feel fits your personal brand or aesthetic – but remember that literally everything can be changed later! So don’t focus too much on this step. Once you’ve done this you’ll be asked to create an account so you can get started on your new blog!
Woohoo! You now have a blog.
3. Connect Your Domain
Your next step is connecting your domain to the new blog.
From the Home Menu select Settings > Domains.
Then click Use a Domain I Own, and type in your domain name.
Select Connect from Provider and choose Google Domains from the list of providers.


The last part requires you to login to the same Google account you used for Google Domains - and voila! Your domain is now being connected. Squarespace also has a great breakdown of these exact steps - how to connect your Google domain to Squarespace.
Aaaand you now have a fully functioning blog! It may look like a template and have zero blog posts, but that will soon be fixed! Small steps, people.
4. Adding Your Blog Posts
The template you chose may already include a blog, but in case yours doesn’t, here’s how to add a blog page to your website and start creating blog posts!
In the home menu, go to “Pages”.
Click the plus icon under Main Navigation and choose blog.


From there you can choose a blog layout you want for your main blog page. Don’t worry too much about this now as it can be changed later – later on you could create a custom page for your blog posts that doesn’t follow the standard layout that Squarespace offers. My main blog page is custom, and it collects all the blog posts as well as including additional elements like popular posts and who I am. More on this later!
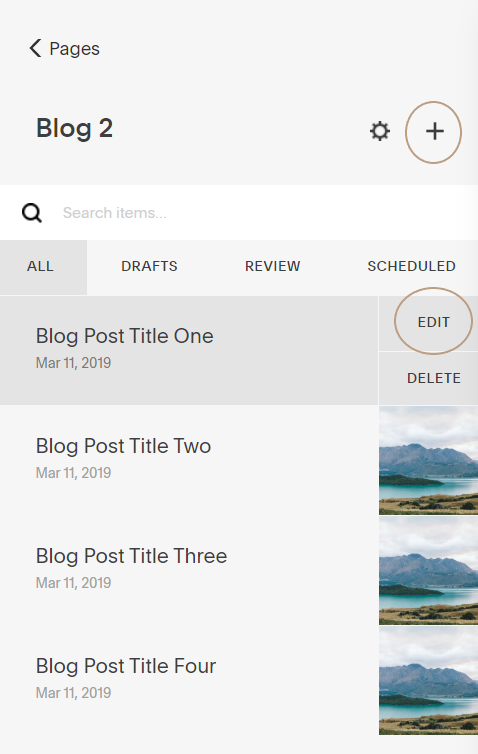
For now, choose a blog layout that you like. My recommendation is Blog 2, the grid layout, because this one is the easiest to navigate and displays a lot of posts without the user having to scroll for miles! Once you’ve chosen your blog layout, Squarespace will get you to confirm the name of the page.
Choose a simple name for this page since it’s going to be the place where your users will spend the most time. “The Blog” or “Blog” works fine – don’t overcomplicate it. A title like “journal” isn’t so obvious and your users may struggle to find it.
Also make sure your “slug” – the URL of that page – is named the same as this is going to be the first part of every blog post URL. You don’t want people clicking on your blog post with the URL: www.yourwebsitename.com/my-blog-72536/blog-post-title because they’ll probably be put off.
Squarespace gives you four blog post drafts to play around with, but you can edit these by hovering over the title and clicking “edit.” To add a new blog post, click the plus icon.
A little box pops up and this is where you can write your blog post, as well as adjust all the settings. Blogging with Squarespace is great because everything is so simple and easy to navigate. Enter your title and write your post in the space where is says “write here.” You’re not limited to text either, you can actually add images, videos and almost any other element you can think of! Just hover over the text box and click the grey droplet to choose other elements.

Adjust Your Settings
There are a couple things you’ll need to consider and adjust in the settings when you’re writing your blog posts in Squarespace – here’s a list of the most important things to remember.
Tags and Categories
Always make sure you add these. It makes your blog posts much easier to organise in the future. For example, if you’ve written a blog post on hair products, you can display other posts about hair products at the bottom of the page, because all those types of blog posts would be categorised under “Hair products.” You can also display posts by tags. The main difference is that categories should be much broader, and you should have fewer of them. Tags can be much more specific – instead of “Hair products” you could use “Men’s curly hair products”.
Comments
Unless you really don’t want to, I would recommend making sure these are turned ON. Allowing comments means your audience can engage with you and it helps your Squarespace blog rank higher on Google as a result.

Thumbnail Image
This is super important to add because it displays above your title on the blog page and any other page you choose to display posts. Adding an image means the blog posts looks more interesting and will get clicked on more often than a simple text title.
You can see below my blog posts display with the thumbnail image at the top – each one with the image I chose for the thumbnail! Simples.
Post URL
Make sure this is pretty! No one likes the look of a blog post like with numbers splattered through it. Make sure you name it something that makes sense as a written phrase, this helps with SEO and lets your reader know they’re in the right place. For example, you could use “best-mens-hair-products” as your blog post URL.

SEO Title and Description
Fill in the SEO description. This is what shows up in Google search underneath your title, right before people click into your Squarespace website.
It needs to be eye catching and relevant.
If you leave it blank, Squarespace will pull a sentence from your blog post to use instead, but it’s not always relevant and often look strange out of context. I usually copy and paste a sentence from my post that describes the content and makes sense on its own.

The Blog Page
Now you know how to add and write individual blog posts, you can also change your main blog page once you have some posts published. Squarespace has settings for the blog as a whole.
You can access these by clicking the cog icon at the top of the menu. Just make sure your URL and SEO settings are adjusted as I have described above!

Blogging with Squarespace is super simple because it automatically lays out your blog posts in a nice format and makes sure the page looks great without much adjustment! This is good for when you’re first getting started with blogging, but if you’re looking for more customisation for Squarespace, it’s worth creating a new page and adding your blog posts using a Grid Summary Block.
This is what I do and I love it because it means I can use additional elements on the same page – the default Squarespace blog page can be limited if you need extra things, like a featured posts section. Keep an eye out for a future blog post on exactly how to do this!
Beautify Your Blog
I also used some Custom CSS to adjust the way my blog looks to my personal taste. Custom CSS means adding a little bit of “code” to my website to make it look the way I want.
I love using CSS because it means I can literally bring my visions to life! It’s also useful in helping my blog look professional, because this helps build trust with readers and establishes my blog as a valuable source of information.
If you’re not sure what Custom CSS is, I have a blog post all about the basics! It covers the foundation of simple CSS as well as where to put it in Squarespace.
Related: A Beginner’s Guide to Squarespace Custom CSS
There we go! That’s exactly how to start a blog with Squarespace in 2020. Remember, you can sign up for a free two week trial of Squarespace here! I hope you enjoyed this post, and please let me know in the comments if you have any questions. Good luck with your blogging endeavours!