
How to Customise Your Squarespace Forms (Updated 2023)
The Squarespace form block recently got a huge update, and it’s now super easy to customise with your brand fonts and colours. Simply click edit on your form block and select the design tab to start making changes. With the addition of “style packs,” you can choose from pre-made options or adjust each part of the form individually!
This update is so valuable because a lot of Custom CSS was needed previously to make the same changes. Now, we can rely exclusively on the Squarespace editor (with one exception) to make almost any change you can think of!
How to Style the Squarespace Form Block
To customise your Squarespace Form, you’ll first want to make sure you’ve added a Form Block somewhere on your website.
To change the design of your form, follow these steps:
In the Home Menu, go to Website and select the page with your form block.
Click Edit, then click on the Form Block and select the Pencil Icon.
Under the Design tab, you can select different Form Styles from the dropdown.
You can choose from the Primary, Secondary or Tertiary button style and the alignment of that button for your form.
You can also choose to Lightbox your form (make it pop up after clicking a button) or add a Background.
If you would prefer to style your form in a specific way, scroll to the bottom of the Form Styles dropdown and click Edit Form Styles. This gives you a huge amount of style options, including fonts, colours, spacing, borders, field shapes and more.
The Squarespace form block settings showing the design tab and form styles.
All forms across your website will take on the same styles (not content). So be aware of this whenever you make changes to the design of your form!
How to Customise the Squarespace Form Fields
If the default Squarespace Form Fields aren’t cutting it for you (me either!) then you can add and remove different form questions, as well as adjust which are required.
To edit the form fields, follow these steps:
In the Home Menu, go to Website and select the page with your form.
Click Edit, then click on the form block and select the Pencil Icon.
Under the Content tab, click Edit Form Fields and you’ll be able to view the existing fields.
Click Edit to rearrange or remove different fields from the form.
Click Add Field and choose from a variety of field types to add to the form.
You’ll be able to add a Label, Description and Placeholder text to each new field.
If the field is more complicated (like a dropdown) you’ll also be able to add Options for the visitor to select.
You can toggle the Required button to force visitors to complete specific fields.

The Squarespace form block settings showing the content tab and editable fields.
How to Change “Required” to an Asterisk on Squarespace Forms
Unfortunately, Squarespace replaced the asterisk with the word “required” for form fields that are marked as required. My best guess is that the word “required” is better for screen readers, so if your accessibility is a huge priority for you, consider keeping it.
However, using an asterisk to denote required fields is standard practice, and I dislike how much messier the word “required” looks!
To replace “required” with an asterisk, follow these steps:
In the Home Menu, go to Website and scroll down to the bottom.
Select Website Tools > Custom CSS.
Copy and paste the following CSS into the box and click Save.
// Removed Required Text //
.form-wrapper .react-form-contents .field-list .title .required, .form-wrapper .react-form-contents .field-list .fields .description.required {
  visibility: hidden;
}
// Add Asterisk //
.form-wrapper .react-form-contents .field-list .title .required:before, .form-wrapper .react-form-contents .field-list .fields .description.required:before {
  visibility: visible;
  content: "*";
}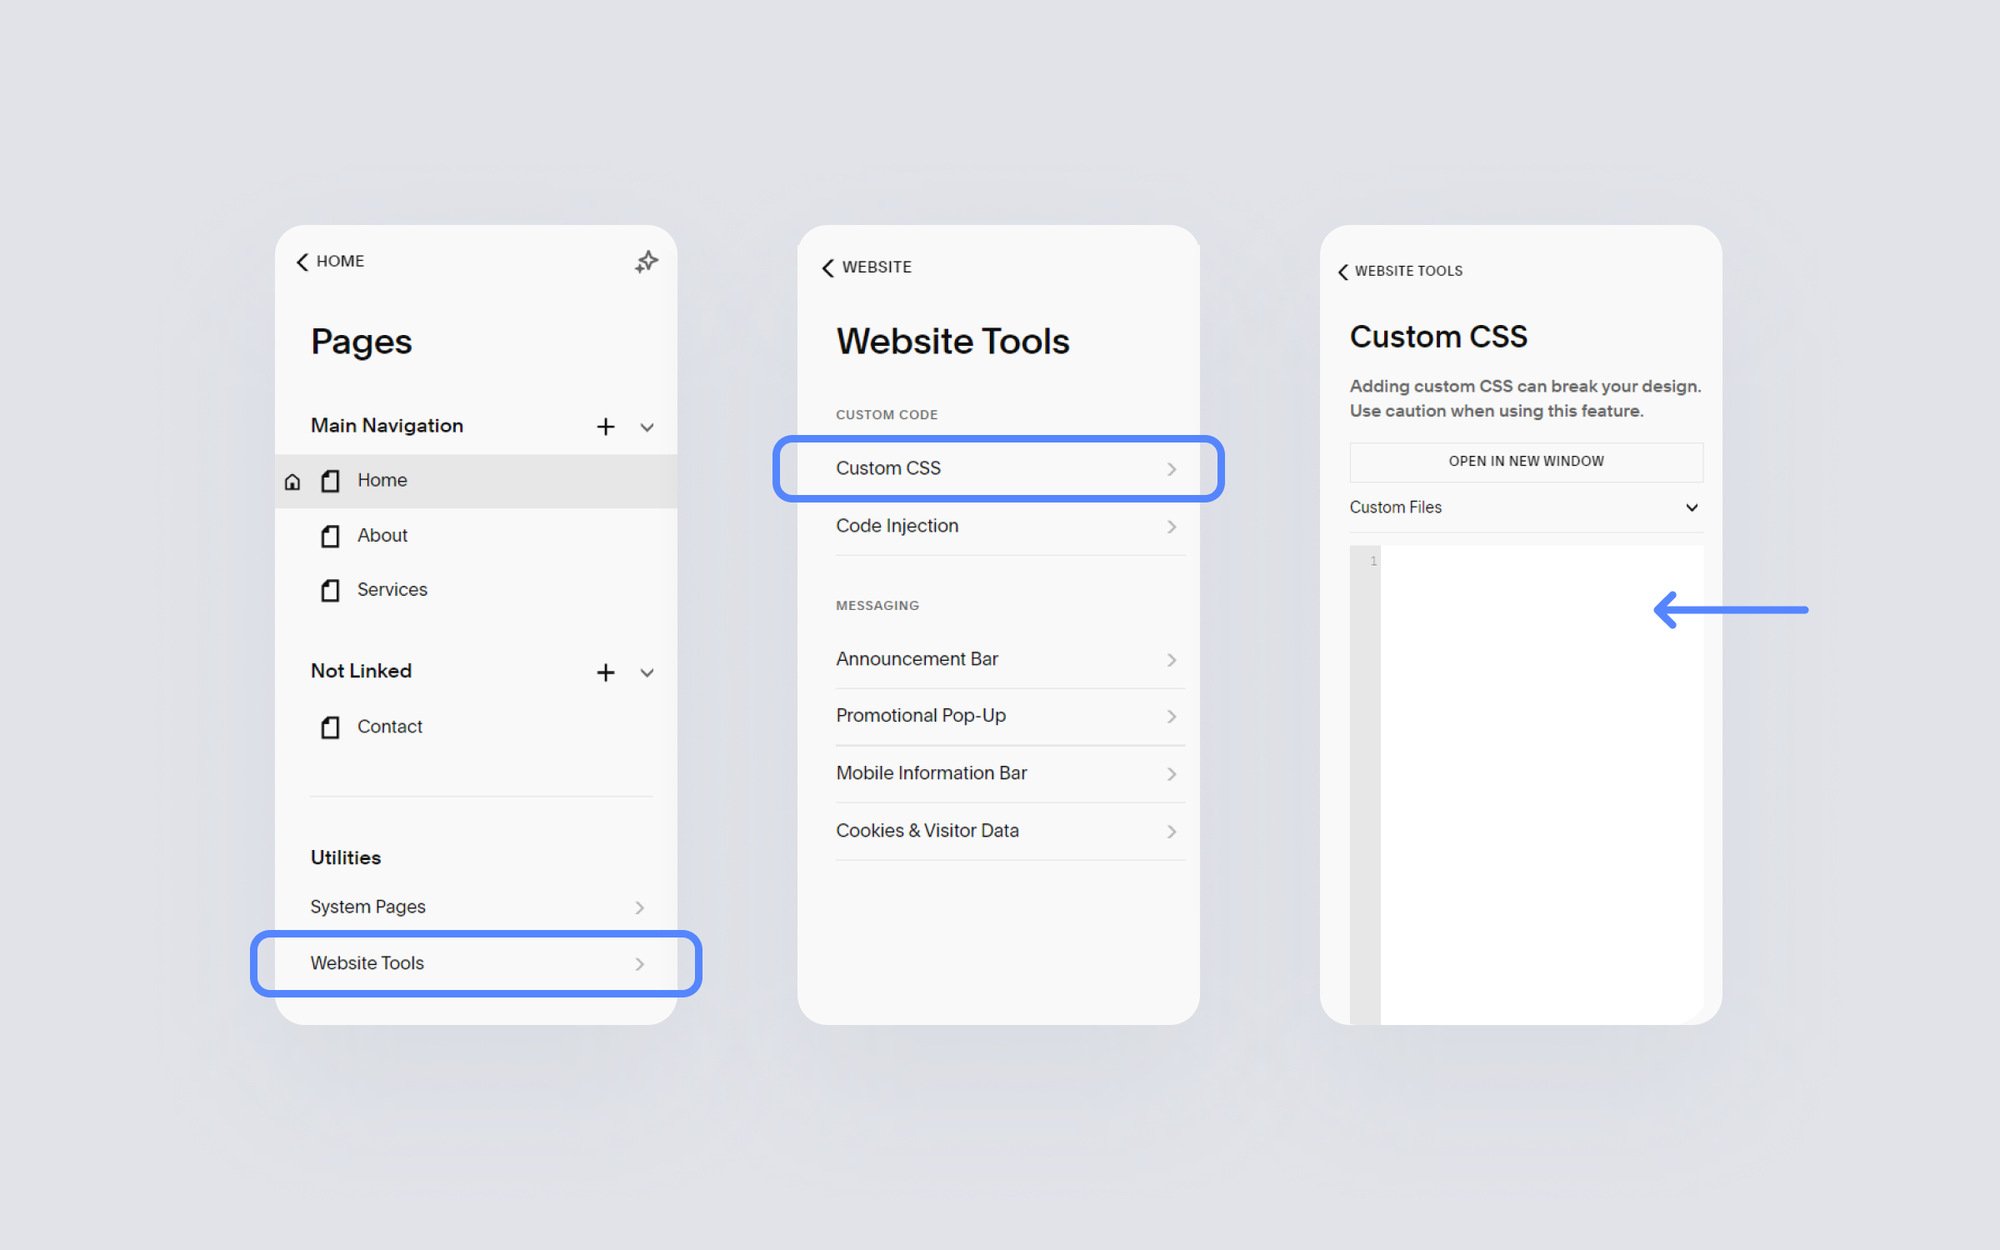
The Squarespace Pages panel, Website Tools and Custom CSS area.
How to Change the Squarespace Form Submission Email
Every form on your website will collect the information your visitor submits and send it to a specific email. If you need to check or change the email address attached to your form, just follow these steps:
In the Home Menu, go to Website and select the page with your form.
Click Edit, then select the form block and click the Pencil Icon.
Under the Storage tab you’ll be able to see which email is connected to the form.
Click Email Notification to change the form submission email.
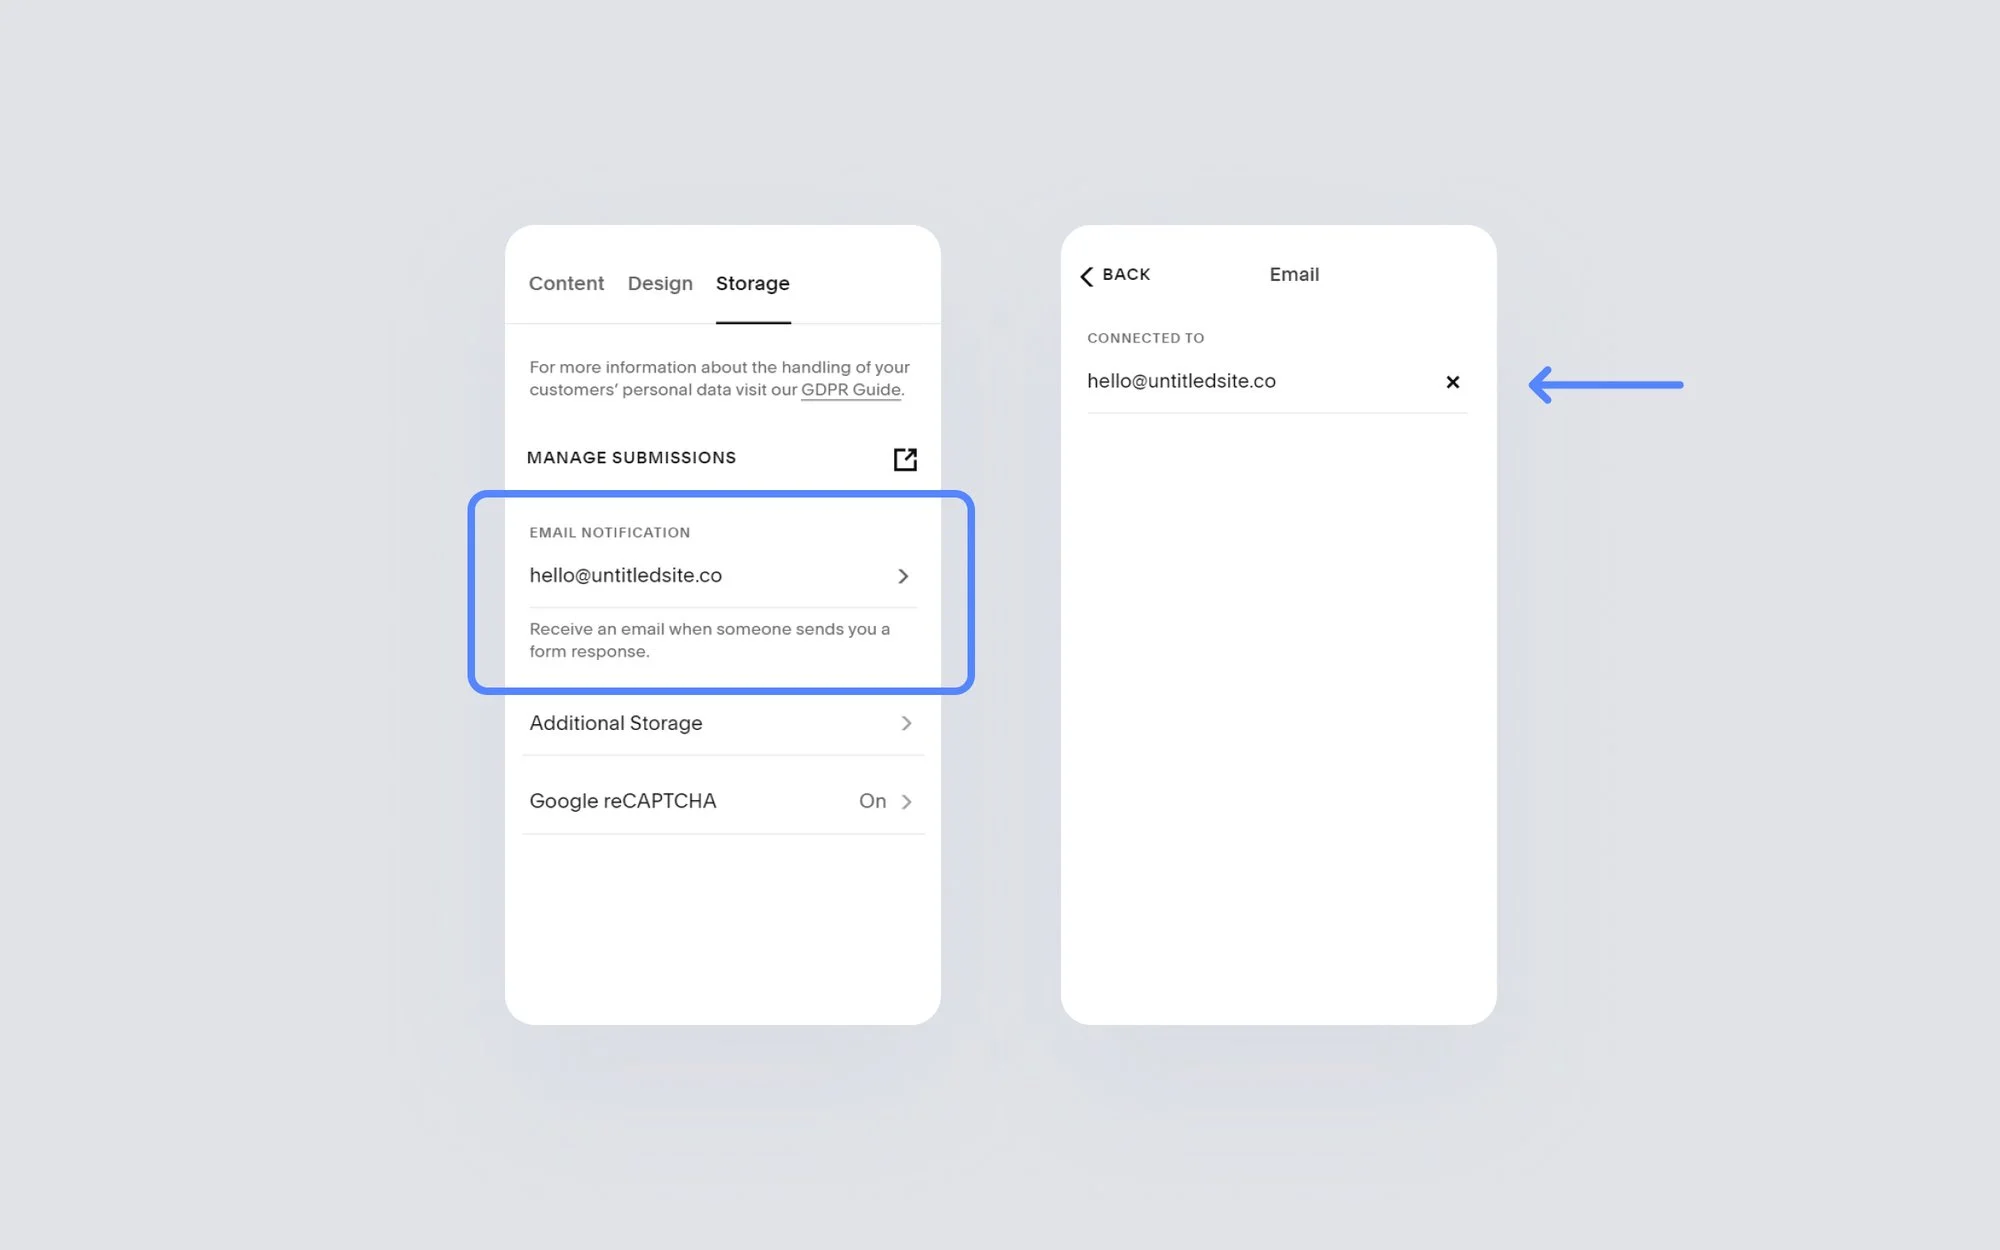
The Squarespace form block settings showing the Storage tab and connected email.
By default, Squarespace form blocks use the email address of whoever created the form block. If you have multiple contributors or editors on your website, definitely check your forms!
Frequently Asked Questions
-
Squarespace form designs are global. This means that all forms across your website will have the same style, even if the questions are different. It sounds limiting, but in reality it’s better if they look consistent across your website!
-
By default, Squarespace form submissions go to the email address of the person who added the form block. It should land in your inbox like any other email.
-
When you create a form, you can give it a specific name. This name will then appear in the subject line when you receive an email submission. You can edit the form and change the name under the content tab if needed.
-
Squarespace will save every form submission as a contact. To review your submissions, go to the Home Menu and select Contacts > Form Submitters.
-
Squarespace recently updated reCAPTCHA on their form blocks. It can now be enabled in the form settings under the Storage tab. The form experience remains the same, which means your visitors no longer need to complete the annoying checks, but the spam will still get filtered out.